Hyperqueue Job Scheduler on Lab Compute Infrastructure
1 hyperqueue Usage Notes
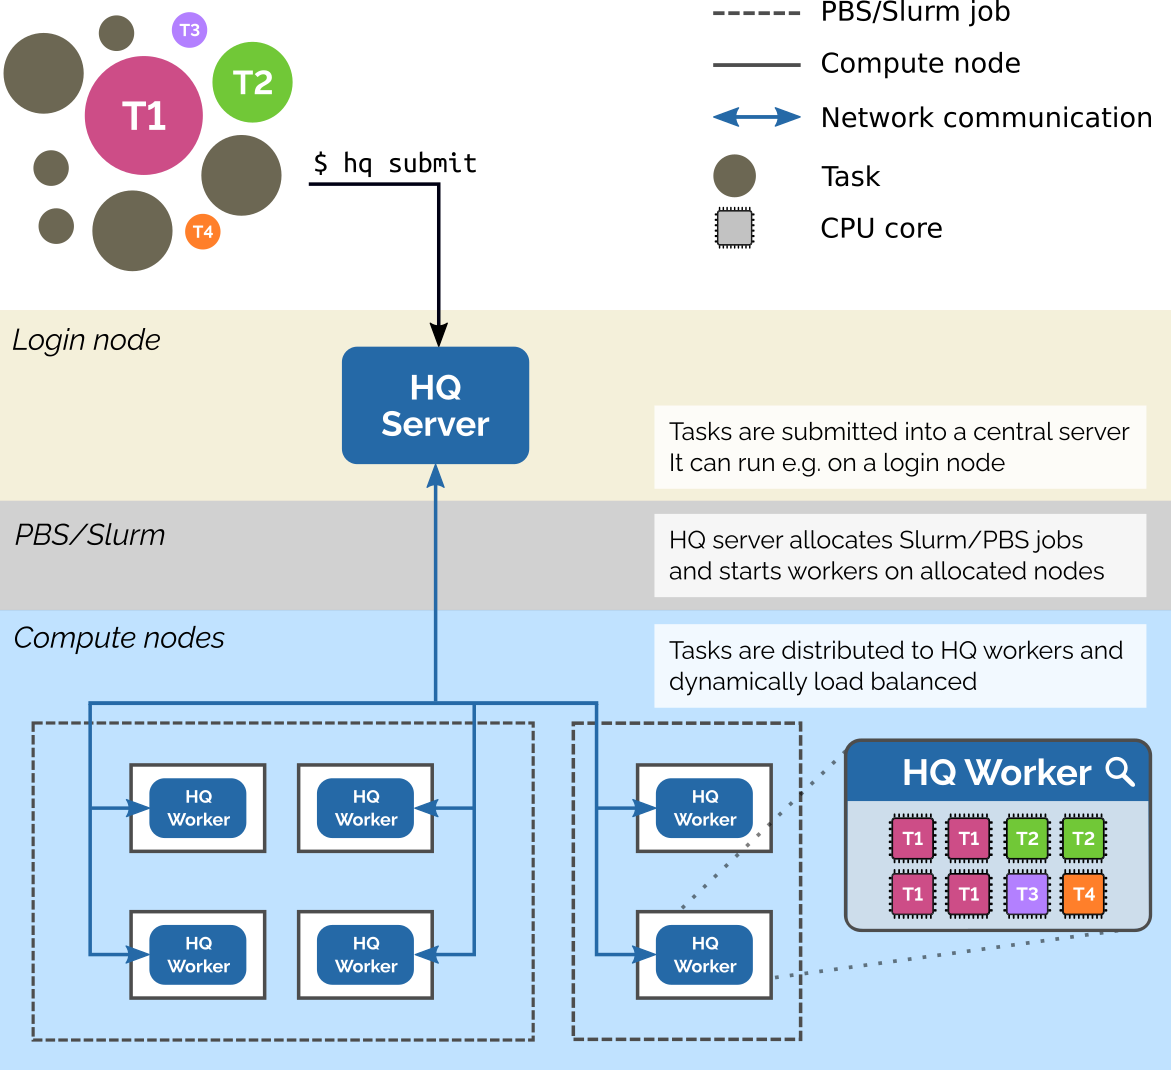
HyperQueue is a tool designed to simplify execution of large workflows (task graphs) on HPC clusters. It allows you to execute a large number of tasks in a simple way, without having to manually submit jobs into batch schedulers like Slurm or PBS. You just specify what you want to compute – HyperQueue will automatically ask for computational resources and dynamically load-balance tasks across all allocated nodes and cores. HyperQueue can also work without Slurm/PBS as a general task executor.
Details on jobs and tasks can be found here.
2 hyperqueue on Lab Infrastructure
2.1 1. Create a HQ server directory
Login to the DELL Ubuntu PC using your username and password.
- Then create a directory with your username. And copy the hyperqueue hostfile to your HQ directory.
mkdir  -p /mnt/bioinformatics_datasets/${USER}/hyperqueue/logs
cp /mnt/bioinformatics_datasets/hostfile.txt /mnt/bioinformatics_datasets/${USER}/hyperqueue/hostfile.txt
2.2 2. ENV variables
Must be exported by ~/.bashrc or ~/.bash_profile
nano ~/.bash_profileThen copy the lines below in the the Nano text editor and save the file.
export HQ_BASE=/mnt/bioinformatics_datasets/${USER}
export HQ_SERVER_DIR=$HQ_BASE/hyperqueue
export HQ_JOURNAL=$HQ_BASE/hyperqueue/logs/.hq_journal_${USER}
export HQ_HOSTFILE=$HQ_BASE/hyperqueue/hostfile.txt
2.3 3. Remote Access
- Create a config file for your ssh keys, if it doesn’t alreadt exist. Then copy the ssh config template to your new ssh directory.
The ssh config file in your HOME directory must be named exactly ‘config’ (no file extenstion, etc) in order to be detected by the ssh command line tool.
CONFIG_TEMPLATE='/bioinformatics_resources/ssh_config_template.txt'
mkdir $HOME/.ssh
cp -n $CONFIG_TEMPLATE $HOME/.ssh/config- Generate SSH key
To connect to the workers, an SSH key will need to be created for the bioinfosrv01 and bioinfosrv02.
Login to the DELL Ubuntu PC using your username and password.
Then inside your home directory, follow the instructions in this document.
2.4 Server on DELL Ubuntu PC
Use tmux for running the server in the background. See tmux documentation on how to start and exit a tmux session.
# start a new tmux session
tmux new-session -s hq

# check that your environment variables are present
env | grep "HQ"
then disconnect from the tmux session
# should print out the log information
hq server start --journal $HQ_JOURNAL
Next, check the server is still up
# now check that the server is still running OK
`hq server info`| Server UID Client host Client port Worker host Worker port Version Pid Start date Journal path | bTQEQ6 sp-alphafold-ws 36107 sp-alphafold-ws 46789 v0.23.0 1597226 2025-08-08 16:29:01 UTC /mnt/bioinformatics_datasets/${USER}/hyperqueue/logs/.hq_journa |
2.4.1 Checking the server status and logs
hq journal export $HQ_JOURNAL > $(dirname $HQ_JOURNAL)/hq_journal.log2.5 Workers
We will decide best use of --work-dir and --group options, for now we can start workers with limited options except time-out.
2.5.1 Workers on HP Ubuntu Servers
- Create a hq server directory
mkdir -p $HOME/.hq-server- must symlink the access.json to the worker machines
ln -s /mnt/bioinformatics_datasets/${USER}/hyperqueue/hq-current/access.json $HOME/.hq-server- Use ssh-deploy to start the worker on the remote machine.
If you you need to find more information about errors add the following parameter --debug to hq worker command
# start a new tmux session
tmux new-session -s hq_worker

hq worker deploy-ssh $HQ_HOSTFILE --show-output &

# disconnect from tmux session - check workers are running
hq worker list
hq worker list --all| ID | State | Hostname | Resources | Manager | Manager Job ID |
| 1 2 | RUNNING RUNNING | bioinfosrv01 bioinfosrv02 | cpus 48; mem 251.34 GiB cpus 48; mem 251.34 GiB | None None | N/A N/A |
3 Submit a job to the queue
DIR="/bioinformatics_resources/ngs_test_datasets/human/rnaseq"
FQ1=$DIR/reads_1.fq.gz
FQ2=$DIR/reads_2.fq.gz
OUTDIR="data/hq_test"

hq submit --progress \
  --stdout $HQ_SERVER_DIR/logs/%{JOB_ID}.%{TASK_ID}.stdout \
  --stderr $HQ_SERVER_DIR/logs/%{JOB_ID}.%{TASK_ID}.stderr \
  docker run -i \
  -v $DIR:$DIR \
  -v $PWD:$PWD \
  -w $PWD  \
  --userns=host --user $(id -u):$(id -g) \
  quay.io/biocontainers/fastqc:0.11.9--0 sh -c "mkdir -p fastqc_test && \
    fastqc --verbose -o fastqc_test --threads 4 $FQ1 $FQ2 && \
    fastqc --version"
4 Use with Nextflow pipelines
To use the hyperqueue executor with nextflow pipelines, copy the hyperqueue nextflow config file to your own directory where you are running the pipeline.
Pipelines can generate a lot of large data files. See
See Data Management for detailed instructions.
- Create a Nextflow Launch Directory
# define the directory where you are running the pipeline.
NEXTFLOW_DIR=$HOME/nextflow_example

cd $NEXTFLOW_DIR- Copy the config to your own launch directory
# copy the config file
NXF_HQ_CONFIG='/bioinformatics_resources/hyperqueue.nextflow.config'
cp $NXF_HQ_CONFIG .- Include the config in the
nextflow runcommand
Also, will need to set the profile parameter to ‘hyperqueue’.
For example if using the nf-core/rnafusion pipeline.
nextflow -c hyperqueue.nextflow.config \
  run nf-core/rnaseq \
  -r dev \
  -profile test,hyperqueue
4.0.0.1 References
4.0.1 Params to test
–group NXF
–idle-timeout 01:00:00
–time-limit 24:00:00
–on-server-lost finish-running
–wait-between-download-tries 10s
Start the worker on the ‘head node’ as well, to utilize as much of the available resources as possible.
tmux
hq worker start &
hq worker list --all